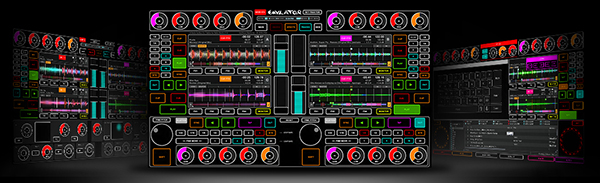
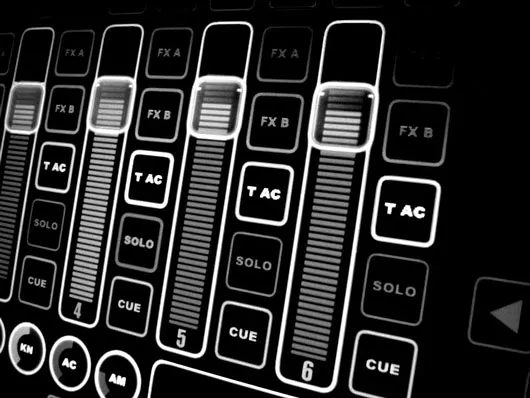
MonoTouchLive

MonoTouchLive now is free

What is MonoTouchLive?
MonoTouchLive its a standalone MIDI software controller, designed for all Djs want better control over Ableton Live and now with version 3.x of TRAKTOR PRO and more to come in future versions !

Is MonoTouchLive hardware controller?
No, it is a software engine that turns any touch screen LCD panel or tablet PC computer in a hardware controller for Ableton Live and TRAKTOR.

How does MonoTouchLive work?
MonoTouchLive is designed to run on MS Windows as a standalone aplication, or Apple Intel machines runing native windows with bootcamp. (XP, VISTA, 7)
The basic idea is take advantage of any computer capable of managing two monitors at same time (dual desktop, extended desktop)
Absolutely all new models of PC notebooks, and new Intel Macs, can support this feature.
MonoTouchLive runs on the second LCD touch screen capable monitor, or can run on tablet PC and take control of remote machine using IP over LAN software.
Example:

Its possible take control of MAC OSX running Ableton, from pc with touch screen or Tablet PC running monotouchlive using the exelent tool Music Lab Midioverlan CP


How does MonoTouchLive control Ableton Live?
The system sends MIDI to Ableton Live using a MIDI over network software device, or virtual MIDI wire device, through a third party application.
You can run MonoTouchLIve on a standalone tablet PC, notebook, macbook etc etc, and send MIDI over network or use MIDI LoopBack driver device, and run MonoTouchLive on the same MS Windows PC where Live its running and use second monitor output.
The layout in MonoTouchLive its fixed.
Using midi learn feature available in Ableton Live, users can assign the buttons based on their preferences.

How many touches are supported?
MonoTouchLive supports single touch due to the way that standard touch screens work.

Is MonoTouchLive a “mouse replacement”?
Yes, this system could be considered as a mouse replacement and improvement.
However, you have faster access to common features with just one touch (multitouch is under development)

“I have some recent reports about few disabled persons using my software, and they found MonoTouchLive very ver usefull, this is a really great news!”

What are the System Requirements?
PC Laptop or Intel Apple computer running windows , capable of running 2 monitors at same time (extended desktop, dual desktop)
1gb ram ore more when you run on same machine where Ableton its running.
256mb ram on standalone windows XP machines
Pentium M 1.6 ghz or better, version 3 tested under ATOM cpu and work correctly
LCD touch screen: we recommended any good quality touch system.
If running under Mac OSX, you can use bootcamp, or Parallel Desktops.
You can run on a tablet or desktop etc etc and use to control Ableton Live hosted in another machine.

What LCD screen model should use?
Version 3 run on any wide screen LCD.

How much resources does MonoTouchLive use?
Moving sliders, pressing button,etc etc only takes about 2% to a maximum 4% of cpu and only about 20mb ram. (tested on pentium 4 2ghz).

Does the System provide visual feedback to actions?
Yes, all buttons, sliders, path, etc etc, return visual feedback when you touch the touch screen, in perfect coordination with the same buttons, sliders, etc etc on Ableton.

Ableton Live its a Trade Mark of Ableton AG, visit the webpage for more info.

****************************************************************************************************************
DOWNLOAD AND INSTALL


1- Download MonoTouchLive (demo)

Download MonoTouchLive 2.7       click here

Download MonoTouchLive 3.22     click here

After download, run the setup. Installer content:

MonoTouchLive.exe, this is monotouchlive software
MTL-Ableton.als this is the empty ableton set with midi maps for all functions.
MTL.cfg, this file save MonoTouchlIive parameters.

For version 3:
Download  and uncompress the file in c:/
After uncompress  you see a folder C:/monotouchlive/

Now continue:


2- Download and install MIDI Yoke
Download and install MIDI Yoke, restart your machine if needed.

click here

Visit http://www.midiox.com/ for more info about MIDI Yoke

3-SETUP MonoTouchLive + Ableton + MIDI Yoke
Open Ableton 7.
Now open the set provided on Monotouchlive zip file, MTL-Ableton.als, this file have all cotrollers mapped, you can use for skip remap all and make faster test of MonoTouchLive
Open
on Ableton set MTL-Ableton.als and check midi configuration.


You need enable midi YOKE in this way:

Setup on ableton MIDI YOKE MIDI IN PORT 1
Setup on ableton MIDI YOKE MIDI OUT PORT 3

Now continue:

4- Now connect your touch screen LCD to your PC,
Drag some tunes to ableton and start play ! :)

Remember you can use MonotouchLive with tablets PCs or Touchscreen PC, MAC runing Bootcamp, or can use PC for take control of MAC OSX using the cross plataform MIDI over lan tool:
Music Lab Midioverlan CP five stars !! aplication : )

Very Important!!
MonoTouchLIve not cause Ableton crash, i have too many reports of Ableton freezes, but i discover all that troubles happen machines whith warez version of ableton.
Please use legal software!
Allways open Ableton Live first and then open MonoTouchLive software, do in that order.
For open
MonoTouchLive in full screen on secodnary display, just drag MonoTouchLive (without execute the aplication) to extended desktop and then open the aplication to extended desktop.
MonoTouchLive its designed to run on 1024×768
Make right click over the aplication for see some options available for resize and feet to screen if you use different resolution.

*** Demo stop after 30 minutes, you need reister your copy !!!!

****************************************************************************************************************
Emulator 3.x  run without any restriction.

Emulator 2.x run as demo, use this instructions for register your copy.
Create a folder c:/key
Download and run serial generator, click here
Click in button generate, a fille reg.key is created now in  C:/key/reg.key

Copy reg.key file inside monotouchlive folder located in C:/

****************************************************************************************************************

Ableton Layout Quick Guide
Version v2.7d is 100% compatible with Ableton 7. for Ableton 8.x use new MTL 3.x

This is the master screen of the layout for Ableton Live
This layout have multiple sliders, buttons and knobs for take full controll of 6 TRACKS, in the near future this layout include more channels.
MonoTouchLive provide ableton template with all MIDI objects already maped and is optimized for use with this Ableton layout.
MonoTouchLive is MIDI controller, you can remap any slider, button , knob or pad to any different control inside ableton.

1- Track Control:

STOP: button for stop clip on track.

PLAY:
button for play clip on track, this button have visual feedback for show the staus of clip.

K HI, K MI, K LO:
buttons, kill HI, MID and Low frequencys, for faster multiple frequency kill you can drag your finger over this buttons.

FX:
this buttons shoot effects, every track have 4 buttons, you can switch this buttons pressing button FX , located ath the lower right in main screen.
T AC: this is track activator button, yu cna mute the track with this.

SOLO: this button put track in solo mode.

CUE: button for monitor audio in your headphones.

SLIDER: volume level slider, this slider have special feature called atraction (AT) with atraction you can touch any part of the slider, the knob move to that position, with this feature you no need drag the slider knob for move the knob to specific position, the speed of atraction can be customized.

Every track have buttons called CH labeled with number of track, example


CH 1

If you press any of this buttons,another section of track controll is showed:
Redwin and Forward buttons.
ST L / EN L: this buttons are markers for define the loop lenght and start end position.
LOOP: button for disable or enable loop.
AT: with this rotative knob you can choose the speed of atraction of the slider *
Button <A B >: asign with this button if audio of this track go to left or right side of the crossfader.

2- Master section:

In the master section you see
STOP PLAY
buttons for launch or stop SCENE CLIPS.

M
slider: this is the master volume slider.

LCK:
this is a security button and lock the master slider.

CU:
this rotative knob for select the cue volume (level of you hadphones/monitor) *

* Note:
All circular knobs can be moved dragging your finger up and down over the knob.


3- PADS, CORSSFADER, AND BUTTONS SELECTORS

This section have one crossfader, and 2 pads, leftpad have 8 circles knobs, asignated to EQ8 in ableton live acting like main 8 bands equalizer.
The left pad is premaped for work when FX A is enabled, just enable effect FX A with track playing and drag the circle pad for modulate the effect.
You can remap in ableton any of this circle knobs to any control inside ableton.

BUTTONS SELECTORS
This 6 buttons, switch and show in the layout more objects:


EQ3:
this button enable 3 bands equalizer on tracks


AU:
this buttons enable 9 auxiliar knobs on every track, you can use for MIDI map and control anything you want inside ableton.
Double click con knob 1 , 2 or 3 and this action show sub knobs called A B.

RT: enable return level circular knobs, use this knobs for setup the return level for FX A, FX B, FX C, FX D

BPM: enable BPM section, you can nudge pitch + – , TAP the tempo, and up or down BPM

FX: switch between effects buttons on track
FX A
, FX B, FX C, FX D

CFG: this button show the configuration section

HIDE: this button hide mouse pointer.

SCR:
switch to full screen.

CLE:
this button lock all the layout, butons, sliders pads, etc etc, is very usefull for clean the screen in the midddle of your live act, without generate any error or accidental activation.

SAVE:
this button save the position of slider, knobs, buttons for the next time you open the software.
example: you can setup the speed of atraction (AT) for sliders, then press SAVE for save your custom speed position, the next time you reopen the software you no need reconfigure that atraction knobs due sofwtare read parameters saved.

ADBC:
setup mute buttons to after touch, usefull for saw touchscreen.

ATR:
atraction, enable or disable atraction feature in all sliders.

PWR:
power off the computer directly from this button.

LB:
this knob increase decrease bright of the track number labels.

CP:
this knob is very important for older machines, this knob regulate the refresh frame rate in sliders when are moved and graphical animation is generated, is very usefull for reduce the cpu usage lowering the frame rate for better preoformance in older CPU machines.

KN:
this knob regulate the sensitivity of all circular knobs.

AC:
this knob regulate the speed of atraction on crossfader slider.

AM:
this knob regulate the speed of atraction on master slider.


B# X Y and P# X Y:
all this buttons are usefull for map 8 circle knobs of pad to any MIDI and single pad to any MIDi contol in ableton.

Written by on Sep 2011 Sun in: |
ad ad ad ad


adsense

Copyright 2005-2009 Pablo Martin